Saturday, July 9, 2022

Tomcat Invalid character found in the request target

While running an application in the tomcat server, sometimes we might get the following error.

org.apache.coyote.http11.Http11Processor.service Error parsing HTTP request header
 Note: further occurrences of HTTP request parsing errors will be logged at DEBUG level.
	java.lang.IllegalArgumentException: Invalid character found in the request target [/index.php?s=/Index/\think\app/invokefunction&function=call_user_func_array&vars[0]=md5&vars[1][]=HelloThinkPHP21 ]. The valid characters are defined in RFC 7230 and RFC 3986
		at org.apache.coyote.http11.Http11InputBuffer.parseRequestLine(Http11InputBuffer.java:509)
		at org.apache.coyote.http11.Http11Processor.service(Http11Processor.java:511)
		at org.apache.coyote.AbstractProcessorLight.process(AbstractProcessorLight.java:65)
		at org.apache.coyote.AbstractProtocol$ConnectionHandler.process(AbstractProtocol.java:831)
		at org.apache.tomcat.util.net.NioEndpoint$SocketProcessor.doRun(NioEndpoint.java:1673)
		at org.apache.tomcat.util.net.SocketProcessorBase.run(SocketProcessorBase.java:49)
		at org.apache.tomcat.util.threads.ThreadPoolExecutor.runWorker(ThreadPoolExecutor.java:1191)
		at org.apache.tomcat.util.threads.ThreadPoolExecutor$Worker.run(ThreadPoolExecutor.java:659)
		at org.apache.tomcat.util.threads.TaskThread$WrappingRunnable.run(TaskThread.java:61)
		at java.lang.Thread.run(Thread.java:748)

First, make sure that the domain pointed to the server is working fine or not expired.

From tomcat, it is suggested that

The HTTP/1.1 specification requires that certain characters are %nn encoded when used in URI query strings. Unfortunately, many user agents including all the major browsers are not compliant with this specification and use these characters in unencoded form. To prevent Tomcat rejecting such requests, this attribute may be used to specify the additional characters to allow. If not specified, no additional characters will be allowed. The value may be any combination of the following characters: " < > [ \ ] ^ ` { | } . Any other characters present in the value will be ignored.

Tomcat increased its security and no longer allows raw square brackets or the above characters in the query string.

In order to resolve this issue use relaxedQueryChars attributes inside the server.xml file of tomcat server. Make sure to back up the server.xml file before we change it.

Open the server.xml file using vim or vi and type Shift + i

sudo vim /path_to_tomcat/conf/server.xml

Press Esc and hit :wq! and save the changes

Restart the tomcat server.

Share:

Thursday, July 7, 2022

How to use custom validation class in Grails Application

In this tutorial, we will learn how to add custom validation in the Grails application.

Grails domain classes support the validation by default. So we can simply add the constrains for the domain classes fields as below

class User {
    String username
    String password
    String email
    Integer age
    
    
	static constraints = {
        username blank: false, unique: true
        password size: 5..15, blank: false
        email email: true, blank: false
        age min: 18
	}
}

Now we can simply validate the object using validate() or hasErrors() methods

User user = new User(params) // map the request parameters to user object
if (!user.validate()) {
    // format errors and send to the client
}
User user = new User(params) // map the request parameters to user object
if (user.hasErrors()) {
    // format errors and send to the client
}

Now, let's say that we want to validate some non-domain fields or use a custom validation class to validate the request parameter sent by the user.

We can do so by implementing Validateable trait so that we can add the constrain for the fields in the custom class. Let's look into the example

import grails.validation.Validateable

class UserCommand implements Validateable {

    public static final emailRegex = "^\\w+([\\.-]?\\w+)*@\\w+([\\.-]?\\w+)*(\\.\\w{2,3})+\$"

    UserCommand(def requestParams) {
        email = requestParams.email
        password = requestParams.password
        username = requestParams.username
        age = requestParams.age
    }

    static constraints = {
        username blank: false, unique: true
        password size: 5..15, blank: false
        email email: true, blank: false, validator: emailValidator
        age min: 18
    }
    
    static emailValidator = { String value, UserCommand command ->
        if (!value.find(emailRegex)) {
            return "email.invalid" // getting message from message.properties file
        }
    }
}

In the above example, we can add the constraints after implementing the Validateable on the custom class and do the validation logic similar to the domain classes validation.

Now, let's utilize the above command class inside the controller.

UserCommand userCommand = new UserCommand(requestParams)
        if (!userCommand.validate()) {
            Map result = [success: false, errors: []]
            result.errors = getCommandErrors(userCommand)
            render(result as JSON)
            return
        }
def messageSource

public static List getCommandErrors(def command) {
        List errors = []
        command.errors.allErrors.each { ObjectError error ->
            String msg = messageSource.getMessage(error.code, error.arguments, error.defaultMessage)
            errors.add(msg)
        }
        return errors
    }

For more details visit Grails Validation

Share:

Wednesday, July 6, 2022

How to enable CORS in Grails Application

In this tutorial, we are going to learn how to enable the cross-origin resources sharing CORS in a Grail Application.

Introduction:

Cross-origin resource sharing is the way to trust between the two web services or applications. So if the two web services don't satisfy then a CORS issue may arise.

Cors is a mechanism for the web application that controls listening to certain request from other web applications which is not hosted on the same server. It will not grant access to the content from other applications. So, in order to interact between two different web applications, we need to enable the Cors for that particular app.

Enable CORS in Grails Application:

We can enable cors in application.yml as below

grails:
    cors:
        enabled: true

The above configuration enables the cors for all the origins i.e all applications can interact with our application.

Enable Cors for a specific domain:

application.yml

grails:
    cors:
        enabled: true
        allowedOrigins:
            - https://example.com

This will allow the request only for the domain example.com

Enable Cors for specific requests or URLs:

application.yml

grails:
    cors:
        enabled: true
        allowedHeaders:
            - Content-Type
        mappings:
            '[/api/**]':
                allowedOrigins:
                    - https://example.com

This will allow all the requests from URLs that start with /api for example.com domain. Note that the mapping key must be made with bracket notation i.e [/api/**]

For more detail please visit Grails CORS.

Share:

How to create Local and Remote Tags on Git

This is a quick tutorial on how to create a Tag in Git

Creating the Tag in Git is important because it gives the ability to mark or point to a repository's history.

Basically, we will release the tag once the new version is deployed and finalized. By doing so, if we need the previous Tag version code, we can create a new branch from this tag and use the branch for further manipulation.

Create a Tag:

Before creating the tag make sure to switch to the branch where we want to create a Tag. Use the following command to switch the branch.

git checkout development

Here, development is the branch name to switch, use your own branch name.

Create a tag:
git tag -a v0.0.1-06-07-2022 -m "version 0.0.1 released"

This will create the tag with the name v0.0.1-06-07-2022; please use your own version name and "version 0.0.1 released" as a message

List the Tag:

Now, let's list the available tags created.

git tag

We can see all the created tag output below.

v0.0.1-06-07-2022

Push to the repository:

Once the tag is created it will available only locally. If we are using a code management service provider like Github, Bitbucket, or Gitlab then we need to push the tag to a point on the repository. Use the following command to push

git push origin v0.0.1-06-07-2022

Once the tag is pushed we can see the output similar to below

Enumerating objects: 1, done.
Counting objects: 100% (1/1), done.
Writing objects: 100% (1/1), 176 bytes | 176.00 KiB/s, done.
Total 1 (delta 0), reused 0 (delta 0)
To https://bitbucket.org/repo_name.git
 * [new tag]         v0.0.1-06-07-2022 -> v0.0.1-06-07-2022

Delete the Tag:

Let's first delete the tag created from the remote.

git push --delete origin v0.0.1-06-07-2022

Once the tag is deleted we can see the output similar as below

To https://bitbucket.org/repo_name.git
 - [deleted]         v0.0.1-06-07-2022

Now, let's delete the tag from locally

git tag -d v0.0.1-06-07-2022
Share:

Binance API code -1013 msg - Filter failure: PRICE_FILTER

While implementing the Binance API, we might get the following error.

{
"code":-1013,
"msg":"Filter failure: PRICE_FILTER"
}

This might be due to the mismatch of the given Filter for the price by Binance. As from the Binance Spot Api documentation, the condition that needs to be satisfied is

price >= minPrice
price <= maxPrice
price % tickSize == 0

We can get the Filter value for PRICE_FILTER as below.

For BTC USDT:

https://api.binance.us/api/v3/exchangeInfo?symbol=BTCUSDT

OR

https://api.binance.com/api/v3/exchangeInfo?symbol=BTCUSDT

The output of the above endpoint is:

{
   "timezone":"UTC",
   "serverTime":1657086978303,
   "rateLimits":[
      {
         "rateLimitType":"REQUEST_WEIGHT",
         "interval":"MINUTE",
         "intervalNum":1,
         "limit":1200
      },
      {
         "rateLimitType":"ORDERS",
         "interval":"SECOND",
         "intervalNum":10,
         "limit":100
      },
      {
         "rateLimitType":"ORDERS",
         "interval":"DAY",
         "intervalNum":1,
         "limit":200000
      },
      {
         "rateLimitType":"RAW_REQUESTS",
         "interval":"MINUTE",
         "intervalNum":5,
         "limit":6100
      }
   ],
   "exchangeFilters":[
      
   ],
   "symbols":[
      {
         "symbol":"BTCUSDT",
         "status":"TRADING",
         "baseAsset":"BTC",
         "baseAssetPrecision":8,
         "quoteAsset":"USDT",
         "quotePrecision":8,
         "quoteAssetPrecision":8,
         "baseCommissionPrecision":8,
         "quoteCommissionPrecision":8,
         "orderTypes":[
            "LIMIT",
            "LIMIT_MAKER",
            "MARKET",
            "STOP_LOSS_LIMIT",
            "TAKE_PROFIT_LIMIT"
         ],
         "icebergAllowed":true,
         "ocoAllowed":true,
         "quoteOrderQtyMarketAllowed":true,
         "allowTrailingStop":false,
         "cancelReplaceAllowed":false,
         "isSpotTradingAllowed":true,
         "isMarginTradingAllowed":false,
         "filters":[
            {
               "filterType":"PRICE_FILTER",
               "minPrice":"0.01000000",
               "maxPrice":"100000.00000000",
               "tickSize":"0.01000000"
            },
            {
               "filterType":"PERCENT_PRICE",
               "multiplierUp":"5",
               "multiplierDown":"0.2",
               "avgPriceMins":5
            },
            {
               "filterType":"LOT_SIZE",
               "minQty":"0.00000100",
               "maxQty":"9000.00000000",
               "stepSize":"0.00000100"
            },
            {
               "filterType":"MIN_NOTIONAL",
               "minNotional":"10.00000000",
               "applyToMarket":true,
               "avgPriceMins":5
            },
            {
               "filterType":"ICEBERG_PARTS",
               "limit":10
            },
            {
               "filterType":"MARKET_LOT_SIZE",
               "minQty":"0.00000000",
               "maxQty":"29.33387056",
               "stepSize":"0.00000000"
            },
            {
               "filterType":"MAX_NUM_ORDERS",
               "maxNumOrders":200
            },
            {
               "filterType":"MAX_NUM_ALGO_ORDERS",
               "maxNumAlgoOrders":5
            }
         ],
         "permissions":[
            "SPOT"
         ]
      }
   ]
}

For PRICE_FILTER:

{
               "filterType":"PRICE_FILTER",
               "minPrice":"0.01000000",
               "maxPrice":"100000.00000000",
               "tickSize":"0.01000000"
            },

Lets look into the first condition; price >= minPrice price <= maxPrice

We need to have a price that must be greater or equal to min price and less than or equal to the max price.

Let's look into the second condition: price % tickSize == 0; For this, we might get the precision issue if we don't parse the price. Here, tickSize is in the 2 decimal place so we need to parse the price in 2 decimal places to validate the filter. This will help resolve the issue.

Share:

Tuesday, July 5, 2022

Binance Api code-1013 msg:Filter failure: MIN_NOTIONAL

This is a quick tutorial on how we can resolve the Filter failure: MIN_NOTIONAL

While using Binance API, when placing the order and calling API we might get the following error.

{
"code":-1013,
"msg":"Filter failure: MIN_NOTIONAL"
}

As described on binance spot API documentation, The MIN_NOTIONAL filter defines the minimum notional value allowed for an order on a symbol. An order's notional value is the price * quantity

Now let's look into what is the required values for MIN_NOTIONAL. We can get it from the exchange info endpoint as below

For BTC USDT

https://api.binance.us/api/v3/exchangeInfo?symbol=BTCUSDT

The Output for the above endpoint is:

{
   "timezone":"UTC",
   "serverTime":1657007585516,
   "rateLimits":[
      {
         "rateLimitType":"REQUEST_WEIGHT",
         "interval":"MINUTE",
         "intervalNum":1,
         "limit":1200
      },
      {
         "rateLimitType":"ORDERS",
         "interval":"SECOND",
         "intervalNum":10,
         "limit":100
      },
      {
         "rateLimitType":"ORDERS",
         "interval":"DAY",
         "intervalNum":1,
         "limit":200000
      },
      {
         "rateLimitType":"RAW_REQUESTS",
         "interval":"MINUTE",
         "intervalNum":5,
         "limit":6100
      }
   ],
   "exchangeFilters":[
      
   ],
   "symbols":[
      {
         "symbol":"BTCUSDT",
         "status":"TRADING",
         "baseAsset":"BTC",
         "baseAssetPrecision":8,
         "quoteAsset":"USDT",
         "quotePrecision":8,
         "quoteAssetPrecision":8,
         "baseCommissionPrecision":8,
         "quoteCommissionPrecision":8,
         "orderTypes":[
            "LIMIT",
            "LIMIT_MAKER",
            "MARKET",
            "STOP_LOSS_LIMIT",
            "TAKE_PROFIT_LIMIT"
         ],
         "icebergAllowed":true,
         "ocoAllowed":true,
         "quoteOrderQtyMarketAllowed":true,
         "allowTrailingStop":false,
         "cancelReplaceAllowed":false,
         "isSpotTradingAllowed":true,
         "isMarginTradingAllowed":false,
         "filters":[
            {
               "filterType":"PRICE_FILTER",
               "minPrice":"0.01000000",
               "maxPrice":"100000.00000000",
               "tickSize":"0.01000000"
            },
            {
               "filterType":"PERCENT_PRICE",
               "multiplierUp":"5",
               "multiplierDown":"0.2",
               "avgPriceMins":5
            },
            {
               "filterType":"LOT_SIZE",
               "minQty":"0.00000100",
               "maxQty":"9000.00000000",
               "stepSize":"0.00000100"
            },
            {
               "filterType":"MIN_NOTIONAL",
               "minNotional":"10.00000000",
               "applyToMarket":true,
               "avgPriceMins":5
            },
            {
               "filterType":"ICEBERG_PARTS",
               "limit":10
            },
            {
               "filterType":"MARKET_LOT_SIZE",
               "minQty":"0.00000000",
               "maxQty":"29.33387056",
               "stepSize":"0.00000000"
            },
            {
               "filterType":"MAX_NUM_ORDERS",
               "maxNumOrders":200
            },
            {
               "filterType":"MAX_NUM_ALGO_ORDERS",
               "maxNumAlgoOrders":5
            }
         ],
         "permissions":[
            "SPOT"
         ]
      }
   ]
}

For MIN_NOTIONAL:

{
               "filterType":"MIN_NOTIONAL",
               "minNotional":"10.00000000",
               "applyToMarket":true,
               "avgPriceMins":5
            },

So this defines that the limit order placed must be minimum of $10 i.e price * quantity = total here, the total must be at least 10. If this doesn't satisfy then we will get the mentioned error. So the condition must be satisfied while calling the API.

Share:

Saturday, July 2, 2022

Vue.js How to get query parameter from URL

In this tutorial, we are going to learn how we can get the query parameter from URL.

let's look into the sample example.

http://360learntocode.com?username=test

Using Vue Router:

Here, we want to get the username query parameter. In Vue.js there is an elegant way to get query parameters. If we are using the router then we can get the parameter inside the vue.js component as below.

let username =  this.$route.query.username

Which gives the username value. Another way to get parameters with the router is

let username = this.$route.params.username

Using Javascript URLSearchParams :

We can use URLSearchParams() method which helps to work with the query string of the URL. We can use this inside our vue.js component methods as below.

 methods: {
    getUsername() {
      const queryString = window.location.search;
      if (queryString) {
        const urlParams = new URLSearchParams(queryString);
      	if (urlParams.has('username')) {
          return urlParams.get('username');
        }
      }
      return "";
    }
  }

Or

 methods: {
    getUsername() {
      const queryString = window.location.href;
      if (queryString) {
      	let urlString = queryString.split('?')[1]
        const urlParams = new URLSearchParams(urlString);
      	if (urlParams.has('username')) {
          return urlParams.get('username');
        }
      }
      return "";
    }
  }
Share:

Error: Could not find or load main class org.grails.cli.GrailsCli

This is a quick tutorial on how we can resolve the issue on the Grails project.

For grails application sometimes we might get the following error

Error: Could not find or load main class org.grails.cli.GrailsCli

This might be due to the removal of some dependencies or libraries from the application. Sometimes, while loading multiple applications from IDE while downloading the library for a particular project other libraries for another project might remove so this kind of error might occurs for that project.

Let's first delete the build folder under the application.

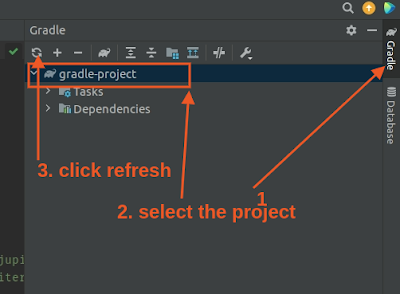
Now, let's refresh the Gradle project. Here we are using IntelliJ Idea, we can refresh the project as below

After refreshing the project it will download the missing dependencies. Then run the application which will resolve the problem.

We can also try cleaning the application.

If we are using the command line then type the following command to clean the application.

grails clean

If we are using the IntelliJ idea then Ctr+Alt+G opens the command window and use the following command.

clean

Now, re-run the app. This will help resolve the issue.

Share:

Friday, July 1, 2022

Error while importing mysql dump sql file Unknown collation: utf8mb4_0900_ai_ci

This is a quick tutorial on how we can resolve the issue while importing the MySQL dump SQL file. Sometimes due to the incompatibility of the MySQL version, the following error might occurs

ERROR 1273 (HY000): Unknown collation: 'utf8mb4_0900_ai_ci'

Before resolving the issue, make sure to back up the dump SQL file

sudo cp sql_file_name.sql sql_file_name_backup.sql 

In order to resolve this issue, we are going to replace the collation utf8mb4_0900_ai_ci with the valid collation utf8_general_ci. For this open, the SQL file with vim or vi and hit Shift + : and add the following replace command and hit enter.

%s/utf8mb4_0900_ai_ci/utf8_general_ci/g

The above command will find each occurrence of 'utf8mb4_0900_ai_ci' (in all lines), and replace it with 'utf8_general_ci'.

Now lets change the CHARSET=utf8mb4 to CHARSET=utf8

%s/utf8mb4/utf8/g

Make sure to hit enter after each command.

Now save the file by Shift+: and type wq!

After the changes, import the dump SQL file which supposes to work fine.

Share:

How to add external jar or library on IntelliJ IDEA project

In this tutorial, we will learn how to add external jar files to the project and load it using Intellij Idea.

Load Jar for Simple Java Application:

Let's create a directory called libs under the project root directory and add all the external libraries. Now we need to load those Jar files using Intellij Idea.

In Intellij, click on >> File >> Project Structure or hit Ctrl + Alt + Shift + s. This will open the popup window to load library.

Note: Select the New project library as Java in step 2 as shown in the figure.

Then click ok to load the libs folder module and click on Apply and Ok. Now we can access the Jar from our java classes.

Loading Jar/Library from Gradle Project:

Add the following inside dependencies in build.gradle file.

dependencies {
//other dependencies
 
compile fileTree(dir: 'libs', include: '*.jar')
}

After that in IntelliJ idea you can see the Gradle on the right side, click on it and refresh the Gradle project as below:

Loading Jar/Library from Maven Project:

Add the following system dependency inside pom.xml file.

<dependency>
           <groupId>com.libName</groupId>
           <artifactId>lib-artifact</artifactId>
           <version>20220117</version>
           <scope>system</scope>
           <systemPath>${basedir}/libs/jar_file_name.jar</systemPath>
       </dependency>

Make sure to change the group id, artifact id, and system path.

After that from the IntelliJ idea on the right side, you can see the Maven click on it and refresh the project by clicking the project name as below.

Share: