Thursday, January 13, 2022

How to use share functionality using web share API in VueJs application

In this tutorial, we are going to implement the web share functionality using Web Share API.

Web Share API is not supported for all browsers. We can see the supported browser for this API from caniuse.


Please follow the tutorial for sharing on social media platforms.

The Web Share API provides a mechanism for sharing links, text, files, and other content utilizing the sharing mechanisms of the underlying operating system. Note that this API only can be used over the secure connection HTTPS.

Sharing Links and Text Description

Let's create a sample vue component called Share.vue and add the following HTML inside the template which contains a simple button to allow users for sharing.

<div class="share" v-if="isSupported">
    <button class="button" @click="webShare">Share</button>
</div>
.button {
  background-color: #4CAF50;
  border: none;
  color: white;
  padding: 15px 32px;
  text-align: center;
  text-decoration: none;
  display: inline-block;
  font-size: 16px;
  margin: 4px 2px;
  cursor: pointer;
}

Here, if the browser supports the API, we are rendering the share button to allow the user to share. If not then we are hiding the button. Now, let's add the data and method used

created() {
    this.isSupport();
  },
  data () {
    return {
      isSupported : false,
      url : "https://caniuse.com/web-share",
      title:"Web API Share",
      description: "Web API Sharing"
    }
  },
  methods: {
    isSupport() {
      if (navigator.share) {
        this.isSupported = true;
      }
    },
    webShare() {
      let self = this;
      navigator.share({
        title: self.title,
        text: self.description,
        url: self.url
      })
    }
  }
}

webShare function allows the user to share link and title and description on different applications of OS.

Sharing Files

webShare() {
      let self = this;
      fetch("file_url").then(function (response) {
        return response.blob()
      }).then(function (blob) {
        let file = new File([blob], "picture.jpg", {type: 'image/jpeg'});
        let filesArray = [file];
        if (navigator.canShare && navigator.canShare({files: filesArray})) {
          navigator.share({
            title: self.title,
            text: self.description,
            files: filesArray,
            url: self.url
          });
        }
      });
    }

If we want to share the file, first load the file and test whether the file can be sharable or not, if it is sharable then it will be shared over the available supported application of OS.

The overall implementation looks as below:

<template>
    <div class="share" v-if="isSupported">
        <button class="button" @click="webShare">Share</button>
    </div>
</template>

<script>
    export default {
        name: "Share",
        created() {
            this.isSupport();
        },
        data () {
            return {
                isSupported : false,
                url : "https://www.360learntocode.com/2022/01/how-to-implement-social-media-share.html",
                title:"Web API Share",
                description: "Web API Sharing"
            }
        },
        methods: {
            isSupport() {
                if (navigator.share) {
                    this.isSupported = true;
                }
            },
            webShare() {
                let self = this;
                navigator.share({
                    title: self.title,
                    text: self.description,
                    url: self.url
                })
            }
        }
    }
</script>

<style scoped>
    .button {
        background-color: #4CAF50;
        border: none;
        color: white;
        padding: 15px 32px;
        text-align: center;
        text-decoration: none;
        display: inline-block;
        font-size: 16px;
        margin: 4px 2px;
        cursor: pointer;
    }
</style>
Share:

Sunday, January 9, 2022

How to point the domain name on amazon server ip address

In this tutorial, we are going to learn how to point the domain name on the amazon server.

If we have domains in some other domain provider and server on amazon then we need to point that domain name to that server.

In order to do so, we need to configure the hosted zone on the amazon Amazon Route 53 service.

Amazon Route 53 is used to route end users to Internet applications by translating names like www.example.com into numeric IP addresses like 192.0.2.1

Go to the amazon console by login into it. Search the service Route 53.

Now click on Hosted zones under DNS management.


Under hosted zones, there is an option to Create hosted zone.


Add your domain name and click on Create hosted zone button to create it.


We can see the two records already created there. Now, we need to first Edit the first record of Type NS.


Now in the Value option at the right, add your server amazon address similar to this ec2-32-353-69-86.ca-central-1.compute.amazonaws.com.

Don't forget to add period(.) at the end of the address i.e

ec2-32-353-69-86.ca-central-1.compute.amazonaws.com.

Click the save button to save

Now we need to add the new record to point to the IP address. For this click Create record to add a new record of Type A and point to the amazon server IP address.

Share:

How to enable public access for amazon s3 bucket

In this tutorial, we are going to learn how we can enable public access for the s3 bucket so that we can access the content or assets on that bucket.

Login to your amazon console and go to the s3 service. There we can see the list of all the buckets. Click on the bucket where we want to set the bucket public access.

In this tutorial, we will learn two ways to give public access.

One is for only the server IP i.e only the server with the corresponding IP can access the content of the s3 bucket.

Another is publicly accessible i.e the content on the buckets can be accessible publicly who has the object link.

Grant public access only for the specific server or server IP


Click on the Permissions tab.


There you can see the Bucket policy option. Click on edit and add the following json config.

{
	"Version": "2012-10-17",
	"Id": "S3PolicyId1",
	"Statement": [
		{
			"Sid": "IPAllow",
			"Effect": "Allow",
			"Principal": "*",
			"Action": "s3:*",
			"Resource": "arn:aws:s3:::bucket_name/*",
			"Condition": {
				"IpAddress": {
					"aws:SourceIp": "34.188.236.204"
				}
			}
		}
	]
}

Note: use your own bucket name instead of bucket_name and SourceIp instead of 34.188.236.204 above.

Click Save Changes we are good to go. Here we are only allowing the IP address 34.188.236.204 i.e the object is only accessible from this server.

Grant public access for all which have s3 bucket content links.


For this, under the Permission tab go to the Block public access (bucket settings) and click on Edit button. Now uncheck Block all public access and save changes.


Now, go to the Bucket policy option and add the following JSON config.

{
    "Version": "2012-10-17",
    "Statement": [
        {
            "Sid": "PublicRead",
            "Effect": "Allow",
            "Principal": "*",
            "Action": [
                "s3:GetObject",
                "s3:GetObjectVersion"
            ],
            "Resource": "arn:aws:s3:::bucket_name/*"
        }
    ]
}

Note: replace your bucket name instead of bucket_name above

Click Save Changes. We are good, now all the objects inside this bucket can access who got the object s3 links.

Share:

How to enable cross origin resources sharing CORS on amazon s3 bucket

In this tutorial, we will learn how we can resolve the CORS issue for the amazon s3 object link. This is typically the configuration setup on the s3 bucket.

Cross origin resources sharing is the way to trust between the two web services. So if the two web services don't satisfy then a CORS issue may arise.

Cors is a mechanism for the web application that controls to listen to certain request from other web applications which is not hosted on the same server. It will not grant access to the content from other applications. So, in order to interact between two different web applications, we need to enable the Cors for that particular app.

Hence, we need to enable the CORS in the amazon s3 bucket to get access to the content inside it.

To enable CORS policy in amazon s3, follow the following steps.

Login in to your amazon management console and go to the services and select s3

Now click on the bucket name listed inside s3 where you want to configure the CORS policy

You can see the different tabs as shown below, so click on the Permissions.


Scroll down to the bottom, we can see the Cross-origin resource sharing (CORS) option. Now click on the Edit button to add the policy. After that add the following JSON configuration

[
    {
        "AllowedHeaders": [
            "*"
        ],
        "AllowedMethods": [
            "GET",
            "HEAD"
        ],
        "AllowedOrigins": [
            "*"
        ],
        "ExposeHeaders": [
            "Content-Range",
            "Content-Length",
            "ETag"
        ],
        "MaxAgeSeconds": 3000
    }
]

Click on save changes. For more advanced configuration please visit the s3 CORS config


Share:

Create UTC count down timer in VueJs

In this tutorial, we are going to learn how to create a UTC countdown timer in VueJs. We are UTC time to manipulate the countdown timer so that every user from different locations can see the same countdown.

Let's create a component called CountDownTimer.vue

Now, let's add some HTML and CSS for the countdown timer in the template.

<div v-if="displayCountDown">
    <h2 class="text-animation" v-if="isLive">Sale is now LIVE</h2>
    <div v-else>
        <h2 class="text-animation">Sale starts in:</h2>
        <section>
            <section class="timer">
                <div>
                    <section>
                        <p>{{ days }}</p>
                        <p>
                            <small>Days</small>
                        </p>
                    </section>
                    <span>:</span>
                    <section>
                        <p>{{ hours }}</p>
                        <p>
                            <small>Hours</small>
                        </p>
                    </section>
                    <span>:</span>
                    <section>
                        <p>{{ minutes }}</p>
                        <p>
                            <small>Minutes</small>
                        </p>
                    </section>
                    <span>:</span>
                    <section>
                        <p>{{ seconds }}</p>
                        <p>
                            <small>Seconds</small>
                        </p>
                    </section>
                </div>
            </section>
        </section>
    </div>
</div>
<style scoped>
    .timer {
        display: flex;
        justify-content: center;
        align-items: center;
    }

    .timer div:first-child {
        border: 1px solid white;
        border-radius: 3px;
        display: grid;
        grid-template-columns: repeat(7, 1fr);
        text-align: center;
        margin-bottom: 1em;
        padding: 1em 1em 0 1em;
    }

    section p:first-child,
    .timer div:last-child span {
        display: contents;
    }

    @media screen and (max-width: 480px) {
        .timer div:last-child {
            margin-left: 2em;
            margin-right: 2em;
        }
    }

    .text-animation {
        animation: color-change 5s infinite;
        font-weight: 400;
    }

    @keyframes color-change {
        0% {
            color: #00FFA3;
        }
        25% {
            color: yellow;
        }
        50% {
            color: #DC1FFF;
        }
        75% {
            color: #F1A945;
        }
        100% {
            color: #00FFA3;
        }
    }
</style>

Add the data used inside the template

data() {
    return {
      days: 0,
      hours: 0,
      minutes: 0,
      seconds: 0,
      isLive: false,
      displayCountDown: false
    }
  },

Create a function called startTimer where we are going to add the timmer logic.

methods: {
    startTimer() {
      const countdownDate = new Date("January 11, 2022 7:59:00").getTime(); // always use UTC time
      let self = this;
      let interval = setInterval(() => {
        const now = new Date();
        let nowUTC = new Date(
            now.getUTCFullYear(),
            now.getUTCMonth(),
            now.getUTCDate(),
            now.getUTCHours(),
            now.getUTCMinutes(),
            now.getUTCSeconds()
        ).getTime();
        const distance = countdownDate - nowUTC;
        const days = Math.floor(distance / (1000 * 60 * 60 * 24));
        const hours = Math.floor(
            (distance % (1000 * 60 * 60 * 24)) / (1000 * 60 * 60)
        );
        const minutes = Math.floor((distance % (1000 * 60 * 60)) / (1000 * 60));
        const seconds = Math.floor((distance % (1000 * 60)) / 1000);
        if (distance <= 0) {
          self.isLive = true;
          clearInterval(interval);
        } else {
          self.days = days;
          self.hours = hours;
          self.minutes = minutes;
          self.seconds = seconds;
        }
        self.displayCountDown = true;
      }, 1000);
    }
  }

Here, first, create the UTC time when the action will happen i.e for e.g the time when the sale starts. Make sure that the time needs to be UTC time.

const countdownDate = new Date("January 11, 2022 7:59:00").getTime(); // always use UTC time

After that, we are using setInterval() method which repeatedly calls a function or executes a code snippet inside it, with a fixed time delay between each call.

Note there we are using 1000 ms time so that the countdown will refresh in every second.

Let's look into the below code

 const now = new Date();
        let nowUTC = new Date(
            now.getUTCFullYear(),
            now.getUTCMonth(),
            now.getUTCDate(),
            now.getUTCHours(),
            now.getUTCMinutes(),
            now.getUTCSeconds()
        ).getTime();

We are getting the current data which gives the current location browser data. We have to convert this to UTC current date. So the user from a different location can see the same countdown

After that, we are calculating distance which will show the countdown is expired or not and days, hours, minutes, and seconds.

If the countdown is expired then we are clearing the setInterval and hiding the countdown and showing some desired text

Start the countdown timer. For this, simply call the startTimer function from created hook.

created() {
    this.startTimer();
  },

The demo output for this example looks like below:


The overall code implementation looks as below:

<template>
    <div v-if="displayCountDown">
        <h2 class="text-animation" v-if="isLive">Sale is now LIVE</h2>
        <div v-else>
            <h2 class="text-animation">Sale starts in:</h2>
            <section>
                <section class="timer">
                    <div>
                        <section>
                            <p>{{ days }}</p>
                            <p>
                                <small>Days</small>
                            </p>
                        </section>
                        <span>:</span>
                        <section>
                            <p>{{ hours }}</p>
                            <p>
                                <small>Hours</small>
                            </p>
                        </section>
                        <span>:</span>
                        <section>
                            <p>{{ minutes }}</p>
                            <p>
                                <small>Minutes</small>
                            </p>
                        </section>
                        <span>:</span>
                        <section>
                            <p>{{ seconds }}</p>
                            <p>
                                <small>Seconds</small>
                            </p>
                        </section>
                    </div>
                </section>
            </section>
        </div>
    </div>
</template>

<script>
    export default {
        name: "CountDownTimer",
        created() {
            this.startTimer();
        },
        data() {
            return {
                days: 0,
                hours: 0,
                minutes: 0,
                seconds: 0,
                isLive: false,
                displayCountDown: false
            }
        },
        methods: {
            startTimer() {
                const countdownDate = new Date("January 11, 2022 7:59:00").getTime();
                let self = this;
                let interval = setInterval(() => {
                    const now = new Date();
                    let nowUTC = new Date(
                        now.getUTCFullYear(),
                        now.getUTCMonth(),
                        now.getUTCDate(),
                        now.getUTCHours(),
                        now.getUTCMinutes(),
                        now.getUTCSeconds()
                    ).getTime();
                    const distance = countdownDate - nowUTC;
                    const days = Math.floor(distance / (1000 * 60 * 60 * 24));
                    const hours = Math.floor(
                        (distance % (1000 * 60 * 60 * 24)) / (1000 * 60 * 60)
                    );
                    const minutes = Math.floor((distance % (1000 * 60 * 60)) / (1000 * 60));
                    const seconds = Math.floor((distance % (1000 * 60)) / 1000);
                    if (distance <= 0) {
                        self.isLive = true;
                        clearInterval(interval);
                    } else {
                        self.days = days;
                        self.hours = hours;
                        self.minutes = minutes;
                        self.seconds = seconds;
                    }
                    self.displayCountDown = true;
                }, 1000);
            }
        }
    }
</script>

<style scoped>
    .timer {
        display: flex;
        justify-content: center;
        align-items: center;
    }

    .timer div:first-child {
        border: 1px solid white;
        border-radius: 3px;
        display: grid;
        grid-template-columns: repeat(7, 1fr);
        text-align: center;
        margin-bottom: 1em;
        padding: 1em 1em 0 1em;
    }

    section p:first-child,
    .timer div:last-child span {
        display: contents;
    }

    @media screen and (max-width: 480px) {
        .timer div:last-child {
            margin-left: 2em;
            margin-right: 2em;
        }
    }

    .text-animation {
        animation: color-change 5s infinite;
        font-weight: 400;
    }

    @keyframes color-change {
        0% {
            color: #00FFA3;
        }
        25% {
            color: yellow;
        }
        50% {
            color: #DC1FFF;
        }
        75% {
            color: #F1A945;
        }
        100% {
            color: #00FFA3;
        }
    }
</style>
Share:

Saturday, January 8, 2022

How to unzip all the zip files present in folder and sub folders using java

In this tutorial, we are going to learn how we can unzip all the zip files present in the folder and sub-folders.

Steps to follow:

  • loop through the folder and subfolders and get the files inside it.
  • Check if the file is a zip file or not
  • If the file is a zip file then extract that file in the corresponding folder

Create a java class called UnzipFolderFile.java. First, let's implement the method which will loop through the folder and subfolders and read the zip file.

public static void searchZipFile(String directoryName) throws IOException {
        File directory = new File(directoryName);
        File[] fList = directory.listFiles();
        if (fList != null)
            for (File file : fList) {
                if (file.isDirectory()) {
                    searchZipFile(file.getAbsolutePath());
                } else if (file.isFile()) {
                    String ext = getFileExtension(file.getName());
                    if (ext.equals(".zip")) {
                        System.out.println("Zip file found");
                        String zipFilePath = file.getAbsolutePath();
                        String unZipOutputPath = getFileNameWithoutExtension(zipFilePath); // using apache commons i.o library
                        unzipFile(zipFilePath, unZipOutputPath);
                        searchZipFile(unZipOutputPath); // for nested zip file
                    }
                }
            }
    }

Here, we are using the recursion in order to search zip files inside sub-folders. If the current file is a directory then it will again search inside this directory. If it is a zip file then it will unzip that file. 

Note that we need to extract the nested zip file i.e zip file inside zip file case so, we used searchZipFile(unZipOutputPath); recursion.

In order to get the current folder, we are using the getFileNameWithoutExtension method which we gonna implement later. Now, let's implement the unzipFile method getFileExtension to get the extension of the file in order to test the current file is a zip file or not

 public static String getFileExtension(String fileName) {
        int lastIndexOf = fileName.lastIndexOf(".");
        if (lastIndexOf == -1) {
            return ""; // empty extension
        }
        return fileName.substring(lastIndexOf).toLowerCase();
    }
public static void unzipFile(String zipFilePath, String outputDir) throws IOException {
        byte[] buffer = new byte[1024];
        ZipInputStream zis = new ZipInputStream(new FileInputStream(zipFilePath));
        ZipEntry zipEntry = zis.getNextEntry();
        while (zipEntry != null) {
            File newFile = new File(outputDir + File.separator, zipEntry.getName());
            if (zipEntry.isDirectory()) {
                if (!newFile.isDirectory() && !newFile.mkdirs()) {
                    throw new IOException("Failed to create directory " + newFile);
                }
            } else {
                File parent = newFile.getParentFile();
                if (!parent.isDirectory() && !parent.mkdirs()) {
                    throw new IOException("Failed to create directory " + parent);
                }
                FileOutputStream fos = new FileOutputStream(newFile);
                int len = 0;
                while ((len = zis.read(buffer)) > 0) {
                    fos.write(buffer, 0, len);
                }
                fos.close();
            }
            zipEntry = zis.getNextEntry();
        }
        zis.closeEntry();
        zis.close();
    }

This method accepts the zip file path and output path to unzip and extract the zip file and output it in the output directory provided.

Now, create getFileNameWithoutExtension method to get the directory path. For this, we are using org.apache.commons.io library. For this, load the jar file in your IDE, or if you have existing projects like Maven or Gradle add the dependency as below.

For Gradle:

Add in build.gradle under "dependencies"

implementation 'org.apache.directory.studio:org.apache.commons.io:2.4'

For Maven:

Add in pom.xml

<dependency>
  <groupId>org.apache.directory.studio</groupId>
  <artifactId>org.apache.commons.io</artifactId>
  <version>2.4</version>
</dependency>
public static String getFileNameWithoutExtension(String name) {
        return FilenameUtils.removeExtension(name);
    }

Now, implement the main method to execute the program

public static void main(String[] args) {
        String directory = "path-to-folder";
        try {
            searchZipFile(directory);
        } catch (IOException e) {
            e.printStackTrace();
        }
    }

The overall implementation looks as below:

package io;

import org.apache.commons.io.FilenameUtils;

import java.io.File;
import java.io.FileInputStream;
import java.io.FileOutputStream;
import java.io.IOException;
import java.util.zip.ZipEntry;
import java.util.zip.ZipInputStream;

public class UnzipFolderFile {
    public static void main(String[] args) {
        String directory = "path-to-folder";
        try {
            searchZipFile(directory);
        } catch (IOException e) {
            e.printStackTrace();
        }
    }

    public static void searchZipFile(String directoryName) throws IOException {
        File directory = new File(directoryName);
        File[] fList = directory.listFiles();
        if (fList != null)
            for (File file : fList) {
                if (file.isDirectory()) {
                    searchZipFile(file.getAbsolutePath());
                } else if (file.isFile()) {
                    String ext = getFileExtension(file.getName());
                    if (ext.equals(".zip")) {
                        System.out.println("Zip file found");
                        String zipFilePath = file.getAbsolutePath();
                        String unZipOutputPath = getFileNameWithoutExtension(zipFilePath); // using apache commons i.o library
                        unzipFile(zipFilePath, unZipOutputPath);
                        searchZipFile(unZipOutputPath); // for nested zip file
                    }
                }
            }
    }

    public static void unzipFile(String zipFilePath, String outputDir) throws IOException {
        byte[] buffer = new byte[1024];
        ZipInputStream zis = new ZipInputStream(new FileInputStream(zipFilePath));
        ZipEntry zipEntry = zis.getNextEntry();
        while (zipEntry != null) {
            File newFile = new File(outputDir + File.separator, zipEntry.getName());
            if (zipEntry.isDirectory()) {
                if (!newFile.isDirectory() && !newFile.mkdirs()) {
                    throw new IOException("Failed to create directory " + newFile);
                }
            } else {
                File parent = newFile.getParentFile();
                if (!parent.isDirectory() && !parent.mkdirs()) {
                    throw new IOException("Failed to create directory " + parent);
                }
                FileOutputStream fos = new FileOutputStream(newFile);
                int len = 0;
                while ((len = zis.read(buffer)) > 0) {
                    fos.write(buffer, 0, len);
                }
                fos.close();
            }
            zipEntry = zis.getNextEntry();
        }
        zis.closeEntry();
        zis.close();
    }

    public static String getFileExtension(String fileName) {
        int lastIndexOf = fileName.lastIndexOf(".");
        if (lastIndexOf == -1) {
            return ""; // empty extension
        }
        return fileName.substring(lastIndexOf).toLowerCase();
    }

    public static String getFileNameWithoutExtension(String name) {
        return FilenameUtils.removeExtension(name);
    }
}
Share:

How to read only specific file from folder and sub folder using Java

In this tutorial, we are going to learn how we can learn only specific files like .png or .jpg or any other file extension which are allocated inside folder and sub-folders.

Here, what we gonna do is to list all the folders and subfolders. After that looping through the folders to filter out and get the specific desired file from those folders.

Create a sample Java class called FolderFileReader.java

Create a method that lists all the subfolders present in the folder.

 public static void listDirSubDir(String directoryName, List<String> directoryList) throws Exception {
        File directory = new File(directoryName);
        File[] fList = directory.listFiles();
        if (fList != null)
            for (File file : fList) {
                if (file.isDirectory()) {
                    String folder = file.getAbsolutePath();
                    directoryList.add(folder);
                    listDirSubDir(folder, directoryList);
                }
            }
    }

We are using recursion in order to list all the subfolders and add the available folders to the List called directoryList

Now, let's create a method that will list all the files present in the particular folder.

public static ArrayList<String> getFolderFiles(String folder) throws Exception {
        ArrayList<String> FileList = new ArrayList<String>();
        FileExtensionFilter filter = new FileExtensionFilter(extension);
        File dir = new File(folder);
        if (!dir.isDirectory()) {
            throw new Exception("Directory does not exists: " + folder);
        }
        String[] list = dir.list(filter);
        assert list != null;
        if (list.length == 0) {
            System.out.println("File not found in this folder : " + dir.getName());
        }
        for (String file : list) {
            String temp = folder + File.separator + file;
            FileList.add(temp);
        }
        return FileList;
    }

The FileExtensionFilter is the filter class used to read specific file like .png or .jpg. 

Let's create the filter class

public static class FileExtensionFilter implements FilenameFilter {

        private String ext;

        public FileExtensionFilter(String ext) {
            this.ext = ext;
        }

        public boolean accept(File dir, String name) {
            return name.endsWith(this.ext);
        }
    }

Now, implement the main method

public static void main(String[] args) {
        String directory = "folder_path";
        ArrayList<String> directoryList = new ArrayList<>();
        try {
            directoryList.add(directory); // adding current directory
            listDirSubDir(directory, directoryList);
            System.out.println("Total directory found: " + directoryList.size());
            int totalFileFound = 0;
            for (String folder : directoryList) {
                ArrayList<String> files = getFolderFiles(folder);
                for (String file : files) {
                    System.out.println(file);
                }
                totalFileFound += files.size();
            }
            System.out.println("Total files found: " + totalFileFound);
        } catch (Exception e) {
            e.printStackTrace();
        }
    }

Here, we are simply getting the list of folders available, looping through it, and getting the files present in each folder.

The overall implementation looks as below:

package io;

import java.io.File;
import java.io.FilenameFilter;
import java.util.ArrayList;
import java.util.List;

public class FolderFileReader {

    private static final String extension = ".dcm";

    public static void main(String[] args) {
        String directory = "folder_path";
        ArrayList<String> directoryList = new ArrayList<>();
        try {
            directoryList.add(directory); // adding current directory
            listDirSubDir(directory, directoryList);
            System.out.println("Total directory found: " + directoryList.size());
            int totalFileFound = 0;
            for (String folder : directoryList) {
                ArrayList<String> files = getFolderFiles(folder);
                for (String file : files) {
                    System.out.println(file);
                }
                totalFileFound += files.size();
            }
            System.out.println("Total files found: " + totalFileFound);
        } catch (Exception e) {
            e.printStackTrace();
        }
    }

    public static void listDirSubDir(String directoryName, List<String> directoryList) throws Exception {
        File directory = new File(directoryName);
        File[] fList = directory.listFiles();
        if (fList != null)
            for (File file : fList) {
                if (file.isDirectory()) {
                    String folder = file.getAbsolutePath();
                    directoryList.add(folder);
                    listDirSubDir(folder, directoryList);
                }
            }
    }

    public static ArrayList<String> getFolderFiles(String folder) throws Exception {
        ArrayList<String> FileList = new ArrayList<String>();
        FileExtensionFilter filter = new FileExtensionFilter(extension);
        File dir = new File(folder);
        if (!dir.isDirectory()) {
            throw new Exception("Directory does not exists: " + folder);
        }
        String[] list = dir.list(filter);
        assert list != null;
        if (list.length == 0) {
            System.out.println("File not found in this folder : " + dir.getName());
        }
        for (String file : list) {
            String temp = folder + File.separator + file;
            FileList.add(temp);
        }
        return FileList;
    }

    public static class FileExtensionFilter implements FilenameFilter {

        private String ext;

        public FileExtensionFilter(String ext) {
            this.ext = ext;
        }

        public boolean accept(File dir, String name) {
            return name.endsWith(this.ext);
        }
    }
}
Share:

How to convert Dicom file into PNG or JPG using Java

In this tutorial, we are going to learn how to convert the Dicom file into Png or Jpg.

If we want to present the Dicom image in the browser or sometimes it might be required to convert it to the desired png or jpg image to manipulate process and analysis.

For this, we can use a very useful library called SimpleItk. Please go over the installation process from this tutorial. If we are dealing with medical images like Dicom, the library is very useful for image processing, manipulation, and analysis. So we suggest using the library.

For reading Dicom metadata please follow this tutorial.

Now, let's begin with the conversion of the Dicom file, for this let's create a sample Java class called DicomConverter.java and create a method for reading the Dicom file

import org.itk.simple.*;
public static ImageFileReader getDcmImageFileReader(String imagePath) {
        ImageFileReader imageFileReader = new ImageFileReader();
        imageFileReader.setImageIO("GDCMImageIO");
        imageFileReader.setFileName(imagePath);
        return imageFileReader;
    }

Now, let's add the method for converting the Dicom

public static void convert(ImageFileReader imageFileReader, String outputPath) {
        Image image = imageFileReader.execute();
        SimpleITK.writeImage(image, outputPath);
    }

Create the main method to run the conversion

 public static void main(String[] args) {
        String inputDicomPath = "inputdicom_path/N2D_0001.dcm";
        String outputPath = "output_path/test.png";
        try {
            ImageFileReader imageFileReader = getDcmImageFileReader(inputDicomPath);
            convert(imageFileReader, outputPath);
        } catch (Exception e) {
            e.printStackTrace();
        }
    }
For Jpg use the .jpg output path.

The overall implementation looks like below:

package dicom;

import org.itk.simple.*;


public class DicomConverter {
    public static void main(String[] args) {
        String inputDicomPath = "/N2D_0001.dcm";
        String outputPath = "/test.png";
        try {
            ImageFileReader imageFileReader = getDcmImageFileReader(inputDicomPath);
            convert(imageFileReader, outputPath);
        } catch (Exception e) {
            e.printStackTrace();
        }
    }

    public static ImageFileReader getDcmImageFileReader(String imagePath) {
        ImageFileReader imageFileReader = new ImageFileReader();
        imageFileReader.setImageIO("GDCMImageIO");
        imageFileReader.setFileName(imagePath);
        return imageFileReader;
    }
    public static void convert(ImageFileReader imageFileReader, String outputPath) {
        Image image = imageFileReader.execute();
        SimpleITK.writeImage(image, outputPath);
    }
}
Share:

Read the Dicom Image metadata using Java

In this tutorial, we are going to learn how we can read Dicom image metadata. 

A Dicom metadata generally contains:

  •  A tag that identifies the attribute, usually in the format (XXXX,XXXX) with hexadecimal numbers.
  • A DICOM Value Representation (VR) that describes the data type and format of the attribute value

We are using SimpleITK library to extract metadata. The library is very handy when used for medical Image analysis. So, please refer SimpleITK library installation from this tutorail.

Once installed and load the library, let's write some Java code that reads metadata. Create a Java file called DicomReader.java

Read the Dicom file using SimpleITK:

import org.itk.simple.ImageFileReader;
public static ImageFileReader getDcmImageFileReader(String imagePath) {
        ImageFileReader imageFileReader = new ImageFileReader();
        imageFileReader.setImageIO("GDCMImageIO");
        imageFileReader.setFileName(imagePath);
        return imageFileReader;
    }
This will read the Dicom file. This example uses the standard SimpleITK native library.

Let's create an actual method that read the metadata from the Dicom Image file

import org.itk.simple.VectorString;
import java.util.LinkedHashMap;
import java.util.Map;
public static Map<String, String> readMetadata(ImageFileReader imageFileReader) {
        Map<String, String> metaData = new LinkedHashMap<>();
        imageFileReader.loadPrivateTagsOn();
        imageFileReader.readImageInformation();
        VectorString metaDataKeys = imageFileReader.getMetaDataKeys(); // get metadata keys
        long metaDataKeySize = metaDataKeys.size();
        System.out.println("Total meta data found: " + metaDataKeySize);
        for (int metaDataKeyIndex = 0; metaDataKeyIndex < metaDataKeySize; metaDataKeyIndex++) {
            String metaDataKey = metaDataKeys.get(metaDataKeyIndex);
            String metaDataValue = imageFileReader.getMetaData(metaDataKey);
            System.out.println("Key: " + metaDataKey + " Value: " + metaDataValue);
            metaData.put(metaDataKey, metaDataValue);
        }
        return metaData;
    }
Here, we are passing the ImageFileReader object, which is obtained from the previous method. And it will extract the metadata and loop through the metadata keys and print key values. pair in the console.

Here is the sample GitHub repo for getting sample test Dicom. Let's add the main method to run the code

 public static void main(String[] args) {
        String imagePath = "path_to_dicom/N2D_0001.dcm";
        try {
            ImageFileReader imageFileReader = getDcmImageFileReader(imagePath);
            Map<String, String> metadata = readMetadata(imageFileReader);
        } catch (Exception e) {
            System.out.println("Error: " + e.getMessage());
        }
    }

The output of the above example will be similar to like this:

Total meta data found: 53
Key: 0008|0008 Value: DERIVED\SECONDARY 
Key: 0008|0016 Value: 1.2.840.10008.5.1.4.1.1.4
Key: 0008|0018 Value: 1.2.826.0.1.3680043.2.1143.1590429688519720198888333603882344634
Key: 0008|0020 Value: 20130717
Key: 0008|0021 Value: 20130717
Key: 0008|0022 Value: 20130717
Key: 0008|0023 Value: 20130717
Key: 0008|0030 Value: 141500
Key: 0008|0031 Value: 142035.93000
Key: 0008|0032 Value: 132518
Key: 0008|0033 Value: 142035.93 
Key: 0008|0050 Value: 
Key: 0008|0060 Value: MR
Key: 0008|0070 Value: BIOLAB
Key: 0008|0080 Value: 
Key: 0008|0090 Value: 
Key: 0008|1030 Value: Hanke_Stadler^0024_transrep 
Key: 0008|103e Value: anat-T1w
Key: 0008|1090 Value: nifti2dicom 
Key: 0010|0010 Value: Jane_Doe
Key: 0010|0020 Value: 02
Key: 0010|0030 Value: 19660101
Key: 0010|0040 Value: F 
Key: 0010|1000 Value: 
Key: 0010|1010 Value: 42
Key: 0010|1030 Value: 75
Key: 0010|21c0 Value: 4
Key: 0018|0050 Value: 0.666666686534882 
Key: 0018|0088 Value: 0.666666686534882 
Key: 0018|1020 Value: 0.4.11
Key: 0018|1030 Value: anat-T1w
Key: 0020|000d Value: 1.2.826.0.1.3680043.2.1143.2592092611698916978113112155415165916
Key: 0020|000e Value: 1.2.826.0.1.3680043.2.1143.515404396022363061013111326823367652
Key: 0020|0010 Value: 433724515 
Key: 0020|0011 Value: 401 
Key: 0020|0012 Value: 1 
Key: 0020|0013 Value: 1 
Key: 0020|0020 Value: L\R 
Key: 0020|0032 Value: -91.4495864331908\-160.06035870244\-142.505487236053
Key: 0020|0037 Value: 0.999032176441525\-0.0217883751691557\0.0382096472372976\0.026519476938784\0.991413870277297\-0.128043957939
Key: 0020|0052 Value: 1.2.826.0.1.3680043.2.1143.6856184167807409206647724161920598374
Key: 0028|0002 Value: 1
Key: 0028|0004 Value: MONOCHROME2 
Key: 0028|0010 Value: 384
Key: 0028|0011 Value: 274
Key: 0028|0030 Value: 0.666666686534882\0.699987828731537 
Key: 0028|0100 Value: 16
Key: 0028|0101 Value: 16
Key: 0028|0102 Value: 15
Key: 0028|0103 Value: 1
Key: 0028|1052 Value: 0 
Key: 0028|1053 Value: 1 
Key: 0028|1054 Value: US

In the above output, the key is the standard metadata key and the corresponding values are the metadata value of Dicom. 

You can find the standard Dicom tags from DICOM Tags. For e.g metadata key 0008|0008 denotes name as Image Type. Please check the link to get all the information on these keys.

The sample Dicom file used here is:


Convert the Dicom into png or jpg using SimpleITK:

Let's write the method which will convert the Dicom to PNG or JPG

 public static void convert(ImageFileReader imageFileReader, String outputImagePath) {
        Image image = imageFileReader.execute();
        SimpleITK.writeImage(image, outputImagePath);
    }
 public static void main(String[] args) {
        String imagePath = "input_path/N2D_0001.dcm";
        String outputImagePath = "output_path/test.png";
        try {
            ImageFileReader imageFileReader = getDcmImageFileReader(imagePath);
            Map<String, String> metadata = readMetadata(imageFileReader);
            convert(imageFileReader, outputImagePath);
        } catch (Exception e) {
            System.out.println("Error: " + e.getMessage());
        }
    }

The overall implementation looks as below:

package simpleitk;

import org.itk.simple.Image;
import org.itk.simple.ImageFileReader;
import org.itk.simple.SimpleITK;
import org.itk.simple.VectorString;

import java.util.LinkedHashMap;
import java.util.Map;

public class DicomReader {
    public static void main(String[] args) {
        String imagePath = "input_path/N2D_0001.dcm";
        String outputImagePath = "output_path/test.png";
        try {
            ImageFileReader imageFileReader = getDcmImageFileReader(imagePath);
            Map<String, String> metadata = readMetadata(imageFileReader);
            convert(imageFileReader, outputImagePath);
        } catch (Exception e) {
            System.out.println("Error: " + e.getMessage());
        }
    }

    public static ImageFileReader getDcmImageFileReader(String imagePath) {
        ImageFileReader imageFileReader = new ImageFileReader();
        imageFileReader.setImageIO("GDCMImageIO");
        imageFileReader.setFileName(imagePath);
        return imageFileReader;
    }

    public static Map<String, String> readMetadata(ImageFileReader imageFileReader) {
        Map<String, String> metaData = new LinkedHashMap<>();
        imageFileReader.loadPrivateTagsOn();
        imageFileReader.readImageInformation();
        VectorString metaDataKeys = imageFileReader.getMetaDataKeys();
        long metaDataKeySize = metaDataKeys.size();
        System.out.println("Total meta data found: " + metaDataKeySize);
        for (int metaDataKeyIndex = 0; metaDataKeyIndex < metaDataKeySize; metaDataKeyIndex++) {
            String metaDataKey = metaDataKeys.get(metaDataKeyIndex);
            String metaDataValue = imageFileReader.getMetaData(metaDataKey);
            System.out.println("Key: " + metaDataKey + " Value: " + metaDataValue);
            metaData.put(metaDataKey, metaDataValue);
        }
        return metaData;
    }

    public static void convert(ImageFileReader imageFileReader, String outputImagePath) {
        Image image = imageFileReader.execute();
        SimpleITK.writeImage(image, outputImagePath);
    }
}

For SimpleITK tutorial, please refer to these docs.

Share:

Friday, January 7, 2022

How to set JVM arguments in IntelliJ Idea

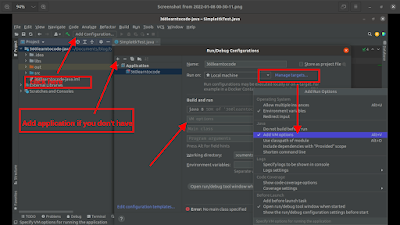
In this tutorial, we will learn how we can set JVM argument in Intellij Idea. For e.g, if we need to set the JVM argument like -Djava.library.path=/path/to/native/library for native library.

For this, click on Add Configuration.   If you haven't created a configuration, then add one and assign the project working directory. Here we are adding 360learntocode as an example.

Now, if we don't see the VM options then click on Modify Option tab to add VM options.

After adding VM options, you can set the JVM arguments there and click apply and ok. If you want to add more than one argument use a comma to separate them.


Share: