In this tutorial, we will learn how to add external jar files to the project and load it using Intellij Idea.
Load Jar for Simple Java Application:
Let's create a directory called libs under the project root directory and add all the external libraries. Now we need to load those Jar files using Intellij Idea.
In Intellij, click on >> File >> Project Structure or hit Ctrl + Alt + Shift + s. This will open the popup window to load library.
Note: Select the New project library as Java in step 2 as shown in the figure.
Then click ok to load the libs folder module and click on Apply and Ok. Now we can access the Jar from our java classes.
Loading Jar/Library from Gradle Project:
Add the following inside dependencies in build.gradle file.
dependencies {
//other dependencies

compile fileTree(dir: 'libs', include: '*.jar')
}
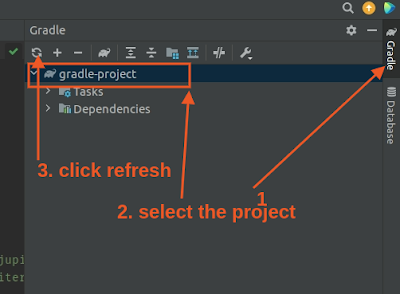
After that in IntelliJ idea you can see the Gradle on the right side, click on it and refresh the Gradle project as below:
Loading Jar/Library from Maven Project:
Add the following system dependency inside pom.xml file.
<dependency>
           <groupId>com.libName</groupId>
           <artifactId>lib-artifact</artifactId>
           <version>20220117</version>
           <scope>system</scope>
           <systemPath>${basedir}/libs/jar_file_name.jar</systemPath>
       </dependency>
Make sure to change the group id, artifact id, and system path.
After that from the IntelliJ idea on the right side, you can see the Maven click on it and refresh the project by clicking the project name as below.


