Showing posts with label Grails 4. Show all posts

Sunday, July 24, 2022

How to parse JSON string to Object and vice versa in Groovy Grails application

In this tutorial, we will learn how to parse or convert the object to JSON string and JSON string to object.

Convert Object to JSON String:

Let's look into the example, here we will parse the Map to JSON string.

Map mapToConvert = [username : "Test", phonenumber : "+10656564"]
List listToConvert = ["Test", "+10656564"]

Now, let's convert to JSON string using JSON class

import grails.converters.JSON
        Map mapToConvert = [username : "Test", phonenumber : "+10656564"]
        List listToConvert = ["Test", "+10656564"]
        String jsonStringFromMap =  (mapToConvert as JSON).toString()
        String jsonStringFromList =  (listToConvert as JSON).toString()
        

You can use any other object data type to convert as above

Convert JSON String to Object:

For converting JSON string to object we are using JsonSlurper as below:

import grails.converters.JSON
import groovy.json.JsonSlurper
		Map mapToConvert = [username : "Test", phonenumber : "+10656564"]
        List listToConvert = ["Test", "+10656564"]
        String jsonStringFromMap =  (mapToConvert as JSON).toString()
        String jsonStringFromList =  (listToConvert as JSON).toString()
        Map convertedMap = parseTo(jsonStringFromMap)
        List convertedList = parseTo(jsonStringFromList)
        
        private static def parseTo(String jsonString) {
        return new JsonSlurper().parseText(jsonString)
    }
        
Share:

Thursday, July 7, 2022

How to use custom validation class in Grails Application

In this tutorial, we will learn how to add custom validation in the Grails application.

Grails domain classes support the validation by default. So we can simply add the constrains for the domain classes fields as below

class User {
    String username
    String password
    String email
    Integer age
    
    
	static constraints = {
        username blank: false, unique: true
        password size: 5..15, blank: false
        email email: true, blank: false
        age min: 18
	}
}

Now we can simply validate the object using validate() or hasErrors() methods

User user = new User(params) // map the request parameters to user object
if (!user.validate()) {
    // format errors and send to the client
}
User user = new User(params) // map the request parameters to user object
if (user.hasErrors()) {
    // format errors and send to the client
}

Now, let's say that we want to validate some non-domain fields or use a custom validation class to validate the request parameter sent by the user.

We can do so by implementing Validateable trait so that we can add the constrain for the fields in the custom class. Let's look into the example

import grails.validation.Validateable

class UserCommand implements Validateable {

    public static final emailRegex = "^\\w+([\\.-]?\\w+)*@\\w+([\\.-]?\\w+)*(\\.\\w{2,3})+\$"

    UserCommand(def requestParams) {
        email = requestParams.email
        password = requestParams.password
        username = requestParams.username
        age = requestParams.age
    }

    static constraints = {
        username blank: false, unique: true
        password size: 5..15, blank: false
        email email: true, blank: false, validator: emailValidator
        age min: 18
    }
    
    static emailValidator = { String value, UserCommand command ->
        if (!value.find(emailRegex)) {
            return "email.invalid" // getting message from message.properties file
        }
    }
}

In the above example, we can add the constraints after implementing the Validateable on the custom class and do the validation logic similar to the domain classes validation.

Now, let's utilize the above command class inside the controller.

UserCommand userCommand = new UserCommand(requestParams)
        if (!userCommand.validate()) {
            Map result = [success: false, errors: []]
            result.errors = getCommandErrors(userCommand)
            render(result as JSON)
            return
        }
def messageSource

public static List getCommandErrors(def command) {
        List errors = []
        command.errors.allErrors.each { ObjectError error ->
            String msg = messageSource.getMessage(error.code, error.arguments, error.defaultMessage)
            errors.add(msg)
        }
        return errors
    }

For more details visit Grails Validation

Share:

Wednesday, July 6, 2022

How to enable CORS in Grails Application

In this tutorial, we are going to learn how to enable the cross-origin resources sharing CORS in a Grail Application.

Introduction:

Cross-origin resource sharing is the way to trust between the two web services or applications. So if the two web services don't satisfy then a CORS issue may arise.

Cors is a mechanism for the web application that controls listening to certain request from other web applications which is not hosted on the same server. It will not grant access to the content from other applications. So, in order to interact between two different web applications, we need to enable the Cors for that particular app.

Enable CORS in Grails Application:

We can enable cors in application.yml as below

grails:
    cors:
        enabled: true

The above configuration enables the cors for all the origins i.e all applications can interact with our application.

Enable Cors for a specific domain:

application.yml

grails:
    cors:
        enabled: true
        allowedOrigins:
            - https://example.com

This will allow the request only for the domain example.com

Enable Cors for specific requests or URLs:

application.yml

grails:
    cors:
        enabled: true
        allowedHeaders:
            - Content-Type
        mappings:
            '[/api/**]':
                allowedOrigins:
                    - https://example.com

This will allow all the requests from URLs that start with /api for example.com domain. Note that the mapping key must be made with bracket notation i.e [/api/**]

For more detail please visit Grails CORS.

Share:

Saturday, July 2, 2022

Error: Could not find or load main class org.grails.cli.GrailsCli

This is a quick tutorial on how we can resolve the issue on the Grails project.

For grails application sometimes we might get the following error

Error: Could not find or load main class org.grails.cli.GrailsCli

This might be due to the removal of some dependencies or libraries from the application. Sometimes, while loading multiple applications from IDE while downloading the library for a particular project other libraries for another project might remove so this kind of error might occurs for that project.

Let's first delete the build folder under the application.

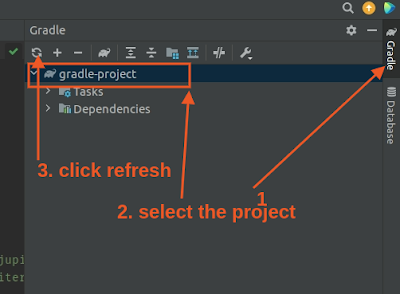
Now, let's refresh the Gradle project. Here we are using IntelliJ Idea, we can refresh the project as below

After refreshing the project it will download the missing dependencies. Then run the application which will resolve the problem.

We can also try cleaning the application.

If we are using the command line then type the following command to clean the application.

grails clean

If we are using the IntelliJ idea then Ctr+Alt+G opens the command window and use the following command.

clean

Now, re-run the app. This will help resolve the issue.

Share:

Wednesday, June 29, 2022

How to use SiftingAppender in Gradle Groovy project

 In this tutorial, we are going to set up the SiftingAppender in our Gradle Groovy project.

Sifting Appender is useful when we want to separate the log files during runtime i.e if we want to separate the log files per thread or per user session basis.

Unfortunately, in the Gradle Groovy project, SiftingAppender is no longer supported since version 1.0.12 as mentioned in Groovy Configuration.

Let's look into the simple example where we are going to configure the SiftingAppender in logback.groovy, where we want to configure the per-user logging mechanism.

import ch.qos.logback.classic.PatternLayout
import ch.qos.logback.classic.sift.MDCBasedDiscriminator
import ch.qos.logback.classic.sift.SiftingAppender

appender("USER_ROLLING", SiftingAppender) {
    discriminator(MDCBasedDiscriminator) {
        key = 'userid'
        defaultValue = 'NONE'
    }
    sift {
        appender("FILE-${userid}", FileAppender) {
            file = "Path-to-log/${userid}.log"
            append = true
            layout(PatternLayout) {
                pattern = "%level %logger - %msg%n"
            }
        }
    }
}
logger("package-to-log",TRACE,['USER_ROLLING'], false)

This is a simple example SiftingAppender configuration; this is derived from logback sifting appender xml configuration.

We are using the Mapped Diagnostic Context for mapping the context user to create a separate file. We can do a similar for the thread as well.

Let's set up the MDC for user, the sample example looks as below.

import groovy.util.logging.Slf4j
import org.slf4j.MDC
@Slf4j
class UserLogging {

    public static void debug(String message, String userid = '') {
        setUserMDC(userid)
        log.debug(message)
    }

    public static void error(String message, String userid = '') {
        setUserMDC(userid)
        log.error(message)
    }

    public static void info(String message, String userid = '') {
        setUserMDC(userid)
        log.info(message)
    }

    public static void setUserMDC(String userid) {
        try {
            if (!userid) {
                MDC.remove("userid")
                return
            }
            MDC.put("userid", userid)
        }catch(e) {
            log.error("Error setting user Mapped Diagnostic Context due to "+e.getMessage())
        }
    }
}

Here, if the userid is available then we are setting the MDC for userid so the log file can be written in a separate file per user. If you want to do with request user do the similar in filter class or the place where it suits.

Now, if we run the application we will get the error as a result the appender doesn't work. So, here we found the solution project that extends Logback Gaffer so that SiftingAppender can be configured in Groovy DSL from this Github repo.

Simply download the jar file for that project and add it to the application.

For the Gradle project create a libs directory under the project directory and load and compile from build.gradle file.

Under build.gradle under dependencies{} section:

compile fileTree(dir: 'libs', include: '*.jar')

If we run the application it suppose to work. The log file will be created on the respective file path.

Share:

Friday, January 21, 2022

How to resolve grails-resolving-server-failed-to-start-for-port-8080-address-already-in-use

On Linux:

step1: if your server port already running at port 8080 then, firstly we have to kill this process for this open your terminal and type

lsof -w -n -i tcp:8080

which shows all the list of open file which is running at port 8080. if you type
lsof -w -n -i tcp:9090 if your server is running with port 9090 which shows all the list of open file which are running at port 9090. Here, lsof stand for ls = list and of = opened file. You can see list with pid number.


step2: type sudo kill -9 6911 where 6911 is pid number. Here 9 has its own meaning which is defined as kill command "SIGKILL" you can see this by type in terminal as kill -l . You can use -SIGKILL instead of -9.

step3: run your application. 

On Windows:

- Open and run command prompt as administrator and type following command:
   
   netstat -ano | findstr :8080

This command will find and list the process that uses this port.

Now, we need to kill the process, for this use following command:

   taskkill /pid 5884 /f

Where 5884 is the PID number. Use your PID number which is obtained previously.
Share:

Saturday, December 18, 2021

How to change Grails App server port in application.yml

This is a quick tutorial on how to set server port while running grails application. By default, grails will use the embedded tomcat server running on port 8080.

Sometimes if another process is using port 8080 then we might get a port address already in use error.

So, what we will do is to change the default port in the config. In grails 3.x version we can set up the custom port inside application.yml file.

Inside application.yml file lets add the following config setup to override the default port 8080.
server:
    port : "8090"
Now if we run the application, it will run on port 8090. 

If we want to configure the setup within the environment then we can do as below:
environments:
    development:
        server:
            port : "8090"
This will set the server port only for the development environment. Re-run the application.
Share:

Sunday, November 21, 2021

Error occurred running Grails CLI: No profile found for name [web]. (Use --stacktrace to see the full trace)

In grails application, the error mentioned below might occur.


Error |
Error occurred running Grails CLI: No profile found for name [web]. (Use --stacktrace to see the full trace)

Process finished with exit code 1
This might be of different reason. Let's try to fix it by deleting the build folder under the application and re-run the application. 

This might work in most cases if this doesn't help then try to clean the app. 

If you are using the command line then type the following command to clean the application.
grails clean
if you are using the IntelliJ idea then Ctr+Alt+G opens the command window and use the following command.
clean
Now, re-run the app.
Share:

How to configure multiple database in Grails application

In this tutorial, we are going to learn how to configure multiple databases in the grails 3.x application. This is necessary when you are dealing with multiple databases from the same application especially when dealing with an existing remote database. We are using different MySql databases for testing.

Let's create three MySql databases called db_default, db_one, db_two. Let's look into the application.yml file to configure the different databases and we will do it for the development environment, in other environments, the procedure will be the same.


environments:
    development:
        dataSource:
            dbCreate: update
            url: jdbc:mysql://localhost:3306/db_default
            driverClassName: com.mysql.jdbc.Driver
            dialect: org.hibernate.dialect.MySQL5InnoDBDialect
            username: root
            password: root
Here, we are setting the default database as db_default. So for this database, all the gorm queries will be the same as in a normal application.

Now, let's set up for other two databases.
        dataSources:
            first:
                dialect: org.hibernate.dialect.MySQLInnoDBDialect
                driverClassName: com.mysql.jdbc.Driver
                username: root
                password: root
                url: jdbc:mysql://localhost:3306/db_one
                dbCreate: update
            second:
                dialect: org.hibernate.dialect.MySQLInnoDBDialect
                driverClassName: com.mysql.jdbc.Driver
                username: root
                password: root
                url: jdbc:mysql://localhost:3306/db_two
                dbCreate: update

For more than two, we need to define the databases by defining dataSources and giving the corresponding names. Here the custom name is whatever name you want. We are giving the name first for db_one and second for db_two.

The overall implementation for application.yml file looks as below:
environments:
    development:
        dataSource:
            dbCreate: update
            url: jdbc:mysql://localhost:3306/db_default
            driverClassName: com.mysql.jdbc.Driver
            dialect: org.hibernate.dialect.MySQL5InnoDBDialect
            username: root
            password: root
        dataSources:
            first:
                dialect: org.hibernate.dialect.MySQLInnoDBDialect
                driverClassName: com.mysql.jdbc.Driver
                username: root
                password: root
                url: jdbc:mysql://localhost:3306/db_one
                dbCreate: update
            second:
                dialect: org.hibernate.dialect.MySQLInnoDBDialect
                driverClassName: com.mysql.jdbc.Driver
                username: root
                password: root
                url: jdbc:mysql://localhost:3306/db_two
                dbCreate: update
Now, how we can use the domain classes for the specific databases. Let's create a simple domain class called Book.groovy.
class Book {
    String title
    
    static mapping = {
        datasource 'first' 
    }
}
In the above example, the Book table is mapped to the db_one database so all operations regarding this will be in db_one database. Similarly, we can map the second database as well. We can map the single domain to multiple databases as below:
class Book {
    String title
    
    static mapping = {
        datasources([ConnectionSource.DEFAULT, 'first', 'second'])
    }
}
In the above example, the Book domain will be available in all the databases.

Now, let's look into how we can query for the specific database.

The first DataSource specified is the default when not using an explicit namespace, so in this case, the default one is used. But you can call GORM methods on the 'first' or 'second' DataSource with the DataSource name, for example:
def book = Book.first.get(1) // this will get from db_one
book.first.save() //this will save in db_one
def book = Book.second.get(1) // this will get from db_two
book.second.save() // this will save in db_two
def book = Book.get(1) // this will get from db_default
book.save() // this will save in db_default

We can use groovy native SQL as well. Let's look at the example. 
import grails.transaction.Transactional
import groovy.sql.Sql
import org.springframework.beans.factory.annotation.Autowired
import org.springframework.beans.factory.annotation.Qualifier

import javax.sql.DataSource

@Transactional
class DbOneService {

    @Autowired
    @Qualifier('dataSource_first')
    DataSource dataSource

    def test() {
        def sql = new Sql(dataSource)
        def rows = sql.rows("select * from....")
        println "rows: "+rows
    }
}
Here, we are creating the DbOneService which is annotated with Qualifier where the db_one database name is configured as dataSource_first. This will provide the db_one database connection to do DB operation. You can simply execute the native SQL command as shown above. Similarly, we can do the same for the second database called db_two.
import grails.transaction.Transactional
import groovy.sql.Sql
import org.springframework.beans.factory.annotation.Autowired
import org.springframework.beans.factory.annotation.Qualifier

import javax.sql.DataSource

@Transactional
class DbTwoService {

    @Autowired
    @Qualifier('dataSource_second')
    DataSource dataSource

    def test() {
        def sql = new Sql(dataSource)
        def rows = sql.rows("select * from....")
        println "rows: "+rows
    }
}
This way, we can deal with multiple databases.
Share:

Friday, January 1, 2021

How to use static content in app root directory in grails

In Grails latest version, it provides static assets management mechanism. You can use different files under the corresponding folders.


All the images will go under the images directory, js files go under the javascripts directory and CSS goes under the stylesheets directory. These files will be accessed by the URL path start with "/assets/".

Now, what if you don't want to use this structure or need to use the root path for some static file content.

For this, grails provide another option to manage static resources. So, what you can do is create the /resources/public directory under /src/main/ and use static resources there.


For example, if you had a file under /src/main/resources/public/images/example.jpg path then you can access that file using https://example.com/static/images/example.jpg.

This means, your file can be accessed with "/static/" URL by default.

If you want to access the file in the app root directory, setup the following configuration under application.groovy

grails.resources.pattern = '/**'

Now, for the above example the file can be accessed with https://example.com/images/example.jpg URL and if the file is in /public/ directory that file can be accessed with root path https://example.com/file.js
Share:

Tuesday, June 2, 2020

Hot reloading the resources file for changes in Grails.


How to hot reload the resources file when the changes happened in Grails.


I was working on Grails 3.3.0 and hot reloading was not working while changing in the resources files. So, I found some workaround which is worth sharing here. There are the following steps to resolve the issue.

  1. Configure to watch the directory.
  2. Watch the directory for code changes
  3. Reload spring resources config
  4. Load from the application

Configure to watch the directory:


Here I am creating a class BeanWatcher.groovy to watch the config file changes.


import grails.spring.BeanBuilder
import grails.util.Environment
import grails.util.Holders
import groovy.util.logging.Slf4j
import org.grails.core.exceptions.GrailsConfigurationException
import org.grails.spring.DefaultRuntimeSpringConfiguration
import org.grails.spring.RuntimeSpringConfigUtilities
import org.springframework.beans.factory.support.BeanDefinitionRegistry

import java.nio.file.FileSystems
import java.nio.file.FileVisitResult
import java.nio.file.Files
import java.nio.file.Path
import java.nio.file.SimpleFileVisitor
import java.nio.file.StandardWatchEventKinds
import java.nio.file.WatchEvent
import java.nio.file.WatchKey
import java.nio.file.WatchService
import java.nio.file.attribute.BasicFileAttributes
import java.util.concurrent.atomic.AtomicBoolean
    
    class BeanWatcher extends Thread{
    
    
    private final WatchService watchService
    private long sleepTime = 1000
    private AtomicBoolean stop = new AtomicBoolean(false)
    
    public BeanWatcher(Path path){
        watchService = FileSystems.getDefault().newWatchService()
        walkAndRegisterDirectories(path)

    }
    

    private void walkAndRegisterDirectories(final Path start){
        // register directory and sub-directories
        Files.walkFileTree(start, new SimpleFileVisitor<Path>() {
            @Override
            public FileVisitResult preVisitDirectory(Path dir, BasicFileAttributes attrs){
                registerDirectory(dir)
                return FileVisitResult.CONTINUE
            }
        })
    }
    

    private void registerDirectory(dir){

        dir.register(
                watchService,
                StandardWatchEventKinds.ENTRY_MODIFY)
    }
    
    
     @Override
    void run() {

       
    }
    
     static void configureBeanWatcher(){
        Environment environment = Environment.current
        File baseDir = new File(environment.getReloadLocation()).canonicalFile
        String location = baseDir.canonicalPath
        File watchDir = new File(location, "grails-app/conf/spring")
        Path path = watchDir.toPath()
        BeanWatcher beanWatcher = new BeanWatcher(path)
        beanWatcher.start()
    }
    
    
    }

I want to watch the config spring file so I provided the path: "grails-app/conf/spring" under the project directory. As we are running in the thread so the current thread will not be interrupted for each time file changes. Here, we are registering directories and sub-directories.


Watch the directory for code changes:

    @Override
    void run() {

        try {
            WatchKey key
            try {
                while ((key = watchService.take()) != null) {
                    List<WatchEvent <?>> watchEvents = key.pollEvents()
                    for (WatchEvent <?> event : watchEvents) {
                        WatchEvent.Kind <?> kind = event.kind()
                        WatchEvent <Path> pathWatchEvent = cast(event)
                        Path name = pathWatchEvent.context()
                        Path dir = (Path) key.watchable()
                        Path child = dir.resolve(name).toAbsolutePath()
                        File childFile = child.toFile()
                        if(kind == StandardWatchEventKinds.ENTRY_MODIFY){
                            onChange(childFile)
                        }
                    }
                    key.reset()
                }
            } catch (InterruptedException e) {
                e.printStackTrace()
            }
        } catch (IOException e) {
            e.printStackTrace()
        }

    }
        

    @SuppressWarnings("unchecked")
    private static <T> WatchEvent<T> cast(WatchEvent<?> event) {
        return (WatchEvent<T>)event
    }
        
The above code will listen to the file changes and call the method onChange for each time the file changes. Now, it's time to reload our resources file while changes occurred.


Reload spring resources config:

   private static void onChange(File file) { // the changed file 
        processBeanDefinitionRegistry()
    }
    
    public static void processBeanDefinitionRegistry(){
        def springConfig = new DefaultRuntimeSpringConfiguration()
        def application = Holders.grailsApplication
        def context = application.mainContext
        def beanResources = context.getResource(RuntimeSpringConfigUtilities.SPRING_RESOURCES_GROOVY)
        if (beanResources?.exists()) {
            def gcl = new GroovyClassLoader(application.classLoader)
            try {
                RuntimeSpringConfigUtilities.reloadSpringResourcesConfig(springConfig, application, gcl.parseClass(new GroovyCodeSource(beanResources.URL)))
            } catch (Throwable e) {
                throw new GrailsConfigurationException("Error loading spring/resources.groovy file: ${e.message}", e)
            }
        }
        def bb = new BeanBuilder(null, springConfig, application.classLoader)
        bb.registerBeans((BeanDefinitionRegistry)application.getMainContext())
    }


This is the code snippet that I found in the grails where they used to reload the file. This will reload and re-configure the resources file.


Load from the application:

We set up all the necessary config and necessary code inside BeanWatcher.groovy now lets load the file from application for this add the following code.

Application.groovy

    if (Environment.current == Environment.DEVELOPMENT){
            BeanWatcher.configureBeanWatcher()
        }
    
This is only for the development env so we did the same.
Share: